Induction vs. Gas: Picking a range

As part of our remodel, we get to pick new appliances.  We currently have an electric glass top and it’s awful.  Slow response time and imprecise heat control.  When looking at appliances for the new kitchen I knew I wanted anything other than an electric range.  There are two heating technologies worth looking at when picking a new range: Gas and Induction.

Gas Burner (Wikipedia)

Gas
People have been cooking with gas since the 1820s, it’s about as simple as it gets: gas burns, burning gas makes heat, heat cooks food.  Not a whole lot has changed in gas ranges since the 1820s, the mechanics are basically the same: gas flows through a valve into a burner which disperses the gas and burns it in a pattern.  Since the 1820s the ranges have gotten more efficient and safer, we have electric igniters, safety valves and smarter burner designs.  Gas is also the way most restaurants cook.  My last house had a gas range and I really miss it.

Induction in action (GE)

Induction
Induction heats in a way that’s completely different from the traditional electric or gas range.  Induction heats by inducing heat in the cooking vessel rather than transferring heat to the cooking vessel.  In induction cooking, the pot itself generates the heat!  Induction works by using a high power electromagnet in the hob (the equivalent of a burner on a gas range) induces heat in the pan.

Inside of an induction hob (Wikipedia)

Induction is very responsive, heats up quickly, cools down quickly and since it only generates heat in the pan is super efficient.  The picture at the top of this section is of an induction hob that’s not melting ice while boiling water.  Induction is very popular in Europe and Asia and is developing quite the following in the US.  One of the odd limitations of induction is that it requires pans to have some iron content.  This is because induction only works with pans that respond to magnets.  In my case this isn’t a big deal, all of my pans are either All-Clad or some form of cast iron (I’ll have a future post on cookware).

Which one?
In looking for a new range, I had a few requirements:

  1. Responsive – Quick to heat, quick to cool.
  2. High Heat – We do a lot of searing, so I need to be able to get a pan really hot. 
  3. Reliable – Nobody likes calling a service company.
Responsiveness
I bought a portable induction hob to try induction out.  Turns out I love it.  It’s super responsive, as I turn the knob, heat goes up and when I turn the knob down, so does the heat.  I’m able to quickly go from bringing something to a boil to a light simmer.
Gas is also very responsive, gas ranges have infinite controls.  Turn the knob up, more gas comes out, turn the knob down less gas comes out.  I had a gas range in my previous house and I loved the responsiveness of it.
High Heat
People rave about how fast induction causes water to boil but I’m going to be living with this decision for at least 10 years so I wanted something more than anecdotal evidence.  So let’s do some math:
Gas range power is measured in BTU/hr while induction ranges are measured in Watts.  Thankfully, we can convert from one to another.  
I know that more BTU means more power so I went looking for the most powerful gas range I could find.  My search brought me to the Capital Culinarian which has 23,000 BTU burners.  To put that in perspective, I looked at a random GE range and it had a 15,000 BTU “power boil” burner, making the Capital substantially more powerful.  Just for fun, we’ll run the math on the GE range too.
When I mean run the math, I mean ask Wolfram Alpha.  Wolfram says that 23,000 BTU/hr is equivalent to 6,741 Watts.  Wolfram also says that 15,000 BTU/hr is the same as 4,396 Watts.
The most powerful induction cook top I could find had a boost mode that would output up to 4,600 Watts.  It’s a Thermador and it can do that in “boost” mode, where it steals energy from the other burners.  A normal burner is around 2,600 Watts.
So on the surface, the gas range is clearly much more powerful right?
WRONG!  Induction is much more efficient than gas at transferring heat, so we can’t just compare the straight up wattage, we have to account for the efficiency differences.
According to the US Department of Energy, induction is 84% efficient.  Gas ranges are a measly 39.9% efficient.
So now we need to adjust for efficiency: 
Gas (High Power Range): 6,741Watts * 39.9% = 2,690 Watts.
Gas (Normal Range): 4,396 Watts * 39.9% = 1,754 Watts.
Induction (High Power): 4,600 Watts * 84% = 3,864 Watts.
Induction (Normal Power): 2,600 Watts * 84% = 2,184 Watts.
Induction in boost mode blows the gas away and a “normal” induction range is more powerful than a “normal” gas range.

Induction is clearly more powerful, but I think it’s a moot victory.  I’m looking at a high end gas range or a high end induction and I don’t think it matters at that level which is more powerful.
Reliability
This is a tough one.  I couldn’t find any data I’d really trust on reliability but I will say that the gas ranges I’m looking at have minimal electronics and user serviceable parts.  From a reliability stand point, there’s almost nothing to break on a Blue Star or Capital.
The induction cook tops are full of electronics which means more that can break.
I think the gas range wins this one, but again, I don’t have any real data on this and it bugs me that I couldn’t find any.
Conclusion
I’m going with a gas range for a couple of reasons:  I like the reliability aspects, and while this may sound silly, I want knobs and not buttons.  The only induction range I could find that has knobs instead of buttons is made by viking and would cost me more than a gas range.  Further, I like the flexibility of gas, while I don’t have any aluminum pans right now, i do have a round bottom wok which wouldn’t work very well on an induction range.  
If my house didn’t have gas plumbed to it already, or if cost were a more significant factor, I think I’d choose induction and be very happy with it.

I’m a paint snob

I’ll admit it, I’m a paint snob.  I don’t like using cheap paint and I have favorite brands.  I enjoy painting, it’s easy mindless work that I find rewarding.  Adding color to a room through paint is one of the easiest ways to drastically change the way a room looks and feels.  It’s also one of the few remodeling tasks I really don’t mind doing myself.

I hate working with cheap paint, it smells bad, it’s runny and you end up working twice as hard to get the same look.  I believe in using nice paint, I think it lasts longer and more importantly it goes on easier.  Nicer paint is thicker and adheres to the wall better.  When painting a friends house we tried a bucket of Costco paint (once upon a time Costco in Tukwilla sold paint).  It was terrible, it would actually run down the walls and we’d have to quickly roll out the drips.

My favorite paint is Devine Color.  The paint is thick, doesn’t smell and comes in a great set of colors.  It’s also a Zero-VOC paint.  The downside: it’s expensive, last time I bought some it was $54 a gallon.  They’re also the only company I know of that charges for the color samples.  That’s right, they charge $35 for the sample kit, but instead of getting printed samples, you get actual samples of dried paint arranged in color palettes that all match.

When it comes to ceilings, I’m a big fan of Benjamin Moore Muresco Ceiling White.  It sounds silly but it makes a difference.  The BM Ceiling White is a very flat white that makes the room look bigger and gives the room a nice character.  The Ceiling White is a Low VOC paint at less than 50 grams per liter (the max to be “Low VOC” is 250 g/L).

VOC or Volatile Organic Compounds are a family of chemicals that give off fumes which can lead to unpleasant things.  I’m not an expert, nor do I pretend to be but you can learn more here: http://greenliving.about.com/od/greenathome/a/voc_paint.htm

The walls of my house are mostly Divine Sand with Divine Green Tea as an accent. The bedrooms are a mix of Divine Buffalo and Divine Siamese.  I don’t like white walls so I don’t have any.

I’m a firm believer in a coat of primer and two coats of top coat.  Ceilings, walls, trim, doesn’t matter.  Everything gets a coat of primer and two coats of paint.  Primer is something I don’t care a whole lot about, I generally use one of the nicer grades at the big box stores.  Primer is an undercoat that ensures the top coat (the color) adheres well to the wall.  Primer also helps hide the color that’s already on the wall.

I’ll talk about how I paint in a later post.  The way I see it, I’m saving so much money by doing the painting myself that I’ll happily spend more on supplies if it makes my life easier or the project go faster.

Key Pad Locks

Three years ago when I bought my house I replaced the deadbolt we use every day with a key pad deadbolt.  Why these aren’t standard on homes I don’t understand, they’re better to keys in every way.  Way more convenient than having to have a key on you, my wife appreciates not having to fish the key out of her purse.  It’s much more secure, instead of giving my house cleaner or contractors a key to the house that they can copy, I give them each an individual code that I can change easily.  I’ve also given distinct codes to trusted friends, so that they can get in if we need them to (like when I forgot I had a package coming when I was going on vacation, my friend picked it up and left it in the house).

There are two main competitors in this space: Schlage and Kwikset.

I went with the Schlage lock because I prefer the feature set: It’s a manual turn lock and has a larger key space.  The Kwikset lock has a motorized dead bolt which wouldn’t work with my house as my front door is just a hair off from the frame which means I have to hold the door closed when turning the deadbolt.

Kwikset Lock

The Schlage lock

Because I’m sort of  a paranoid person, I’m a little worried that I’ll miss the “low battery” warning and actually lock us out of the house.  I’ve mitigated this concern by putting an old fashioned key inside a combination locked key safe on the outside of the house.  I use the Masterlock key safe that I installed in a way to make sure it isn’t visible from the street.

Total cost for this upgrade: $120.00.  Well worth the convenience and security.

My home is my castle

A few years ago my house was broken into, thankfully nothing was taken but the would be thieves left the door open.  We’re sure we didn’t leave it open as it’s a door we never used and our neighbors noticed an unfamiliar car in our driveway.

We think Harley, our, thirty-five pound labradoodle scared them off.  He’s normally locked in the basement, and if you can’t see him, his bark can be ferocious.

FEAR THE BEAST

My wife got home before me and called the police.  They came quickly (under 5 minutes) and swept the house to make sure there wasn’t anyone inside.  When they opened the door to the basement, our ferociously barking guard dog ran the other way, deeper into the basement.  I rescued him from the backyard after he escaped through the dog door.

Make the home harder than the one next to it.

As you can imagine this really upset us and so we looked into what we can do to secure our home.  There’s an old joke: “How do you out run a bear?” A: You don’t, you just have to outrun the guy next to you.  This was our strategy to home safety, we decided to make our house harder to get into than the ones next to us.

 The first thing I did was replace the rear door and the side door (the one that was used to break in) with modern doors that opened outward.


The reason to make the door open outward is because it’s almost impossible to kick a door in if it opens out.  If you are going to make a door open out make sure you use armored pins in the hinges.  With the door opening out, the hinges are now on the outside of the house.  A traditional pin can be pulled out of the door without opening the door.  An armored pin is protected from removal when the door is closed.

We also replaced all of the screws connecting the door frame to the house with 3″ (or longer) screws that connected the door frame to the studs in the walls next to the door.  In standard construction, the door is connected to the door frame, and the door frame is attached to the house.  If you’re not careful, the door frame won’t be tightly connected to the studs, if that’s the case then a bad guy with a crowbar can pry the door frame away from the house.

This cost us about $2,500.  Two custom wooden doors plus labor to install them.

Second thing I did was put the front porch light on an astronomical timer.  These are marevelous devices that take your latitude and longitude into account and calculate sundown and sunrise every day.  I programmed mine to turn on 20 minutes before sunset and turn off 20 minutes after sunrise.  This switch combined with an energy efficient bulb means my front and side door are well illuminated at night.

Here’s the switch I have: Honeywell Econoswitch.  Under $40, easy to justify.

Third thing I did was make sure all street visible windows are covered with blinds.  Price here varies, but a temporary shade is as little as $10.00.

Fourthly, we put some lights on timers so that the house looks occupied.  I like this one because it allows you to set a random jitter.  This will prevent the light from turning on and turning off at the exact same time every night.

Fifthly, I added a motion sensing light to the back yard, it’s a three bulb 300 watt beast that makes the entire back yard glow if the motion sensor is triggered.

Lastly, don’t underestimate the dogs.  Our dogs may be small and adorable, but if you can’t see them, they sound fierce.  I don’t know that security is the best reason to get a dog, but it is a nice benefit to having one (or two).

What else are we thinking about doing?
We’re looking at doing two more things, I want to add two more motion sensor lights, one to each side of the house as the sides are a little darker than I’d like.

We’re also going to investigate adding security film to our windows, the film is amazing in video, and should keep a bad guy from breaking a window to get in.

The video is really amazing and speaks for itself:

A burglar won’t want to do that for very long, it’s a very loud and very distinctive sound.

What about an alarm?
We briefly thought about an alarm but decided against it for a few reasons:

  1. The police officer who responded said that the average burglar is in a home for about 8 minutes.  I doubt the response time from alarm going off to police on site will be under 8 minutes.
    http://simplisafe.com/blog/burglar-universal-search-pattern-how-burglar-robs-your-home-8-minutes
  2. There isn’t a good solution for false alarms, and with two dogs, false alarms could be a real problem.  In Seattle, you pay $115 per false alarm.
    http://www.seattle.gov/police/programs/alarms/default.htm
  3. They’re expensive, and reactionary.  If the alarm has gone off, the bad guy is already inside.  
  4. I don’t actually believe they prevent burglaries, no data on this, I just don’t buy it.

Asbestos Abatement

My home was built in 1956, the basement was remodeled some time during the 60s.  During the basement remodel the ceiling in the basement was textured with  what is generally called popcorn ceiling.  Popcorn ceiling is a spray on texture that gives the ceiling a textured look.  This was done for acoustic and aesthetic reasons.

Image of popcorn ceiling from Wikipedia
It’s generally safe to assume that popcorn ceiling contains asbestos.  Asbestos is a mineral that was popular with construction up until the late 70s when it was banned because it’s a carcinogen.  Cancer sucks, and nobody wants it but asbestos only causes it if it’s inhaled (and probably in significant quantities).  It’s perfectly safe to leave it on the ceiling as long as you don’t disturb it.  Asbestos was banned from residential construction in the late 1970’s but remaining stockpiles were still allowed to be used, which means asbestos can be found in homes as late as the early 80s.
As a side effect of the home sales process in Seattle is that you don’t want to know for sure if you have asbestos in your home unless you plan on doing something about it.
This is silly but worth repeating:
You don’t want to know for sure if you have asbestos in your home unless you plan to do something about it.

This is because of RCW 64.06.020 aka MLS Form 17.
(Before we go on, I should remind you, I’m not a lawyer or a realtor and I have no idea what I’m doing so this isn’t advice and I’m probably wrong).
Form 17 is required disclosure that every home seller must fill out when selling their home.  One question in particular is of interest for the purpose of this discussion:

7.E. Are there any substances, materials, or products in or on the property that may be environmental concerns, such as asbestos, formaldehyde, radon gas, lead-based paint, fuel or chemical storage tanks, or contaminated soil or water?

Your option when filling this out is Yes, No, “I don’t know”.
If you don’t get the ceiling tested, then you don’t know.  So even though my ceiling was sprayed during the prime asbestos years, I didn’t actually know whether or not there was asbestos in the ceiling, but between us, I knew…
Since it wasn’t going to be disturbed, I didn’t do anything with it, I just left it in place for 3 years.
Unfortunately, as part of our kitchen remodel we’re planning on moving the stair case to the basement, so it’s time to get rid of the asbestos.

The first step was to get the ceiling tested, this is easy:

  1. Wear safety glasses and gloves and anything else you need to wear to feel safe.
  2. Using a water spray bottle, thoroughly wet a small section (1 inch x 1 inch square).
  3. Scrape the section off the ceiling and into a plastic ziploc bag.
  4. Place that bag into another ziplog bag.
  5. Take the sample to NVL Labs.
NVL Labs is a converted house on Hwy 99.  When you enter, you’re greeted by a pair of lovely ladies that are far friendlier than you’d think they’d be given that they’re dealing with poisonous materials all day.  They’ll take your sample and your money and you get an e-mail the next day (or sooner if you want to pay for it), telling you if you have asbestos.  The whole process cost me an hour of my time and $35.00.
In my case, my ceiling contained 9% chrysotile asbestos.  These aren’t particles I want swarming through my home killing my wife, my dogs, me…  So it was time to get some quotes. 
I received quotes from three different companies:
  • NW Solid Rock: $5,525.00 to remove 650 square feet of popcorn ceiling
  • American Environmental Construction: $2,425.00 to remove 562 square feet
  • Partners Construction: $2,058 to remove 586 square feet
Obviously the first bid was way off.  They weren’t competitive at the square foot price, and they weren’t even close on the measurements.  All three companies measured the exact same space, and I got three different measurements.  In all cases, they bid for the exact same amount of work.  My ceiling hadn’t been painted which made things cheaper.  An unpainted ceiling in the Seattle area should go for around $3.50-$4.50 a square foot, $3.50 if it’s a simple ceiling, more if there are complexities (stair wells, soffits, etc…).
I went with the lowest bid, this is highly regulated work and all three companies were licensed and certified to do asbestos abatement.  I didn’t see a benefit in paying more than I had to for the exact same work.
Amusingly, you can do this yourself, but there are a lot of rules you have to follow and you can’t pay anyone to help you unless they’re licensed.  The Puget Sound Clean Energy Agency provides instructions, I think they’re a good read and go through great pains to try to convince you to let someone else do it. http://www.pscleanair.org/regulated/asbestos/homeowners/asb-popcorn.pdf
Before the abatement started I had to remove everything from the basement, including the built in shelving that was attached to the walls.  The only things left in the basement were the washer and dryer.  The abatement guys cover the walls and the floor entirely in two layers of plastic.  They then apply water to the ceiling and scrape the popcorn off.  All of the popcorn ceiling, the plastic sheeting and the hazmat suits they wear need to be double bagged in asbestos disposal bags and then taken to an approved disposal site.  They then apply a clear coat sealant to the ceiling to lock in whatever is left.
When they finish, the ceiling is pretty thoroughly scraped, I was impressed.  I could see pencil marks from when the dry wall was originally put up 50 years ago.  Unfortunately, the vent covers didn’t fit anymore and I’m definitely going to have to get the ceiling refinished.  There was also some minor damage to the walls from the duct tape and staples.  Partners had warned me this would happen.  Amazingly, it took them less than a day to do the work!
I’ve included some pictures of the scraped ceiling:
Ceiling duct after abatement, there’s nothing for the vent cover to  attach to.

Closeup of one of my funky 60’s era can lights.  Notice the sheet rock damage.

Wider shot of the basement.
Once the kitchen remodel is done, we’ll be redoing the ceiling in the basement (and hopefully getting rid of the awful wood paneling).  I’m thrilled with the quality of the work that was done and I’m glad to have the asbestos out of my house.  

In Wall Speakers

I spent yesterday helping a friend of mine install a pair of in wall speakers.  It was surprisingly easy, particularly because we didn’t have to cross any studs.  The installation was simple, speaker up high connected to a jack down low.  The lower jacks aren’t close to each other but everything down low is hidden by a buffet table.  The stereo is hidden in the buffet.

Installing the speakers is exactly like installing an old work box, only much larger.  An “old work box” is an electrical box that is designed to be added to a wall after the walls are up.  The old work box attaches to the wall with a couple of clamps that compress the box to the drywall.    Basically, you cut a hole the size of the box, slide the box in and then tighten the tabs against the wall.  The first 40 seconds of this video do a good job explaining how they work: http://www.youtube.com/watch?v=egHkOIr4RNE

In my friend’s case, the speakers have 6 tabs, and it’s a larger hole.
Installation was easy:

  1. Used a stud finder to mark the studs, you can’t install the speakers if there’s a stud in the way.
  2. We used a pattern that came with the speakers to mark the where the speaker holes should go.
  3. We cut the holes.  Cutting them was easy, we drilled a hole in each corner and used a drywall saw to cut the square out.
For the first speaker we got really lucky.  Behind the sheet rock we cut were two separate power cables that weren’t attached to the stud.  Luckily we didn’t cut those wires.  We also ran into some knob and tube that was attached to the studs, this was surprising to us!  We’ve done quite a bit of electrical work to this house, changing outlets, adding a light, and this was the first time we ran into any knob and tube.

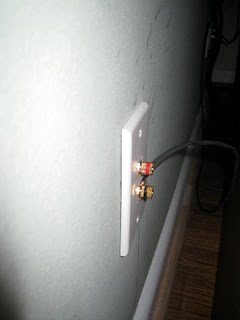
Once we had the hole for the speaker, we cut a hole for the speaker bindings. Speaker wire isn’t high voltage wire so you don’t actually need a work box to put it in.  This let us get away with a much easier to work with low voltage bracket.  The speaker bindings look like a normal face plate except they have a pair of speaker bindings in them. These bindings plug into a face plate blank.  Finally we just had to fish the speaker wire through the wall.  Make sure you use in-wall rated speaker wire!
The whole project took about half a day, including a trip to Home Depot to pick up the supplies.  
The before picture.

Speaker bindings, we probably should have taken the picture before putting the furniture back.

Finished!

First Post

Tap Tap Tap, is this thing on?

I’m Koz, and this is my blog.  This is the internet, so I can call this blog whatever I want but anyone reading this should know:  I don’t know anything about homes.  I’d hardly call this advice, and really, more of story telling about a guy learning about homes, dogs, and homeish stuff like cast iron cookware.

So, read at your own risk, don’t try this at home.  Actually, don’t even bother reading.

-Koz