Working with an Architect Part I

Not a lot of progress to report on at the house so I thought I’d share the first blog in a series on my experiences working with an architect.

Why an Architect?

We knew this would be a big remodel, we wanted to remove a wall and open up the kitchen to the living room.  We also knew we wanted to lay the ground work for a future second floor.  Our floor plan felt challenging to us, we knew there was a specific wall we wanted to take out, but we couldn’t see how we could fix the layout given the other constraints the house shape pushed on us.

Finding an Architect.

There are a lot of architects in Seattle (Google says 2500), in my case finding the architect was easy.  I work at a company with an active homeowners list and I asked for recommendations.  I also visited the PNA Home Design & Remodel Fair.  The fair had several architects manning booths and gave a great opportunity to spend a few minutes chatting with individual architects.  It sort of felt like speed dating for architects.   Based on the recommendations from my work place and the trip to the PNA Home Fair, I narrowed it down to two: Stefan at CAST Architecture and Cristoph at Kruger Architecture.  Both architects are members of the American Institute of Architects (AIA), they both had compelling portfolios and were both dog owners that understood the priority dog ownership had in our thoughts.  I still think both would have done well for us but we ended up choosing Stefan for a couple of reasons: 
  1. We sat and interviewed a client of his that works at the company I do, and it made us confident in his process.
  2. We thought that CAST would be more “aggressive” in his design.  What I mean by that was, we thought Stefan would do a better job of pushing our design past our concerns over budget.  Specifically, we didn’t want our budget concerns delivering “good” when for a bit more, we could get “great”.  I suppose this is the polite way to say we thought Stefan would blow past our budget but that we thought we could control costs ourselves.
  3. Stefan lives nearby, while we hadn’t spoken too much before this started, he’d always been friendly and we liked the idea that he’d have to look at his work for a while.  It turns out we also save some money because we don’t have to pay for travel time when it comes to site visits.

The first meeting.

The first meeting is where you get the dog and pony show from the architect, in each of these, we got a look at the work of each architect as well as hold their perspective on their process and how they operate.  One of the things we liked about Stefan was the very honest and up front discussion about costs and how billing worked.  Architects work by the hour and pass on all expenses, like a lawyer or other professional.  It was good to hear up front about how costs work, you shouldn’t be afraid to ask about this either.

Ok, we picked one, now what?

After the selection process,  we went back and forth a few e-mails to clarify scope.  Once we were satisfied, we signed a contract.  Thankfully, the contracts are all standard and provided by AIA.  They’re clearly worded and spell out every cost you’ll incur with your new best friend.  Once we signed the contract and paid a retainer fee we then scheduled a program meeting.  This was one of the most fun meetings we had with our architect.  It’s a two hour session where he asked us guiding questions to get a feel for what we liked, what we didn’t, and get a general idea of our aesthetic.  
We also scheduled a time for Stefan and an associate to come to the house and take detailed measurements.  This was expensive ($1700 or so) but critical, it’s also nice because we now have very clear “as-built” blueprints to the house.
After the program meeting, and armed with the detailed measurements, Stefan presented us with a collection of sketches:
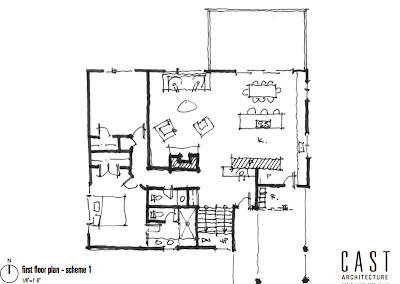
New stairwell location, same front door location.

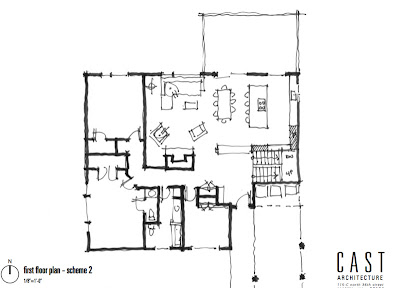
This one moved the stairs but kept the front door in the original location.

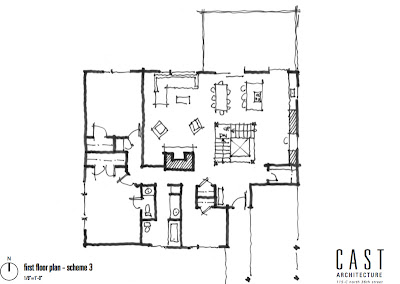
Scheme 3 was the only one that didn’t move the stairs, but did change the orientation. 
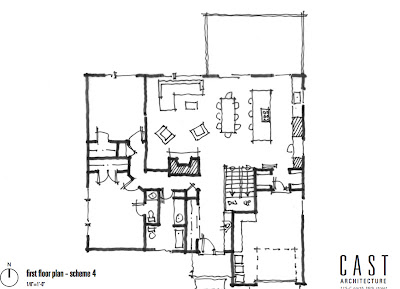
This was our favorite!
Right off the bat, Stefan didn’t constrain himself like we did, it never occurred to us that we could move our stair case.  He also figured out how to give us all of the things we wanted, a nice size island, a garage, a real entryway.  We didn’t actually end up doing the garage in this round, but we’ll get to it eventually.
Once we settled on a sketch, Stefan got more specific about dimensions and we started refining the  plans.  Over a couple of months and many revisions, we eventually ended up with our final layout:
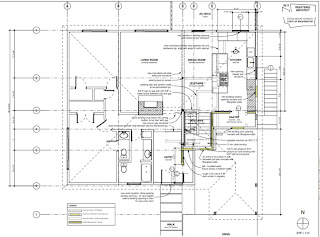
Not bad eh?

What else happened?

In a future post, I’ll talk about other things Stefan has helped us with so far, picking fixtures, selecting a contractor, managing the project, etc… (that’s why this is Part 1).  I’ll also give a cost break down when this is all done.

My kitchen appliances

For the kitchen remodel we’re doing, we had to order new appliances.  I’ve already talked about my range, and range hood.  In addition to those appliances, we needed a wall oven, a fridge, and a pair of microwaves.  We had to buy a new dishwasher when we bought the house but we bought it knowing we would be remodeling so we knew we’d be reusing it.

Dishwasher

We bought our dishwasher when we first moved into the house.  The one that came with the house was probably older than I am, and didn’t actually wash dishes.   Dishwashers come in two general styles, they either have a filter or a garbage disposal built in.  I was adamant that I wanted a garbage disposal, I hate the idea of cleaning a filter and I like that a garbage disposal lets me be lazy about pre-rinsing.  This ruled out the european models, Bosch, Miele, and Asko.  They’re all really nice machines but no disposal means no choice.
For me this was an easy choice, I’ve purchased KitchenAid dishwashers twice before for my rental house and have never had any problems with them.  The model I purchased has three shelves.  The top shelf is a silverware shelf.  This frees up space in the bottom shelf since you don’t need a silverware tray (but it comes with one anyways).

Refrigerator

Refrigerators come in three different styles: Standard depth, Counter Depth and Built-in.  Standard depth fridges are the type most people have, they are deeper than counters which means if they are against a wall with counters they will stick out.  Counter depth are just that, fridges that are designed to be flush with a standard 24″ kitchen counter.  The last class are built-in fridges.  These refrigerators are attached to the walls and are often covered with cabinet panels to blend in.
We ruled out built-in fridges right away, they’re extremely expensive, 3x the cost of the other types.  In short, too rich for our blood.
We also ruled out the standard depth fridges because of our floor plan, the fridge is going to be in line with a wall of cabinets and I didn’t want the fridge to stick out.  This left us with counter depth fridges.  Next requirement was that the fridge have french doors and a bottom freezer, no real reason for this other than we prefer this door style.  
Finally, we wanted a large, and well laid out fridge.  I don’t know anyone who ever said “I wish my fridge wasn’t so big”.
We narrowed it down to three choices: KitchenAid, Samsung, and LG.  The LG and Samsung are definitely larger but we liked the layout of the KitchenAid more.  The KitchenAid is 22 cubic feet while the other two were 26.  However, the KitchenAid had the ice in the bottom and didn’t have an exterior water dispenser this meant that the doors held more.  The Samsung does better in the JD Power reviews and we ruled out the LG because they don’t have as strong of a service network in our area.  
We ended up selecting the KitchenAid, it seemed like the best choice for us, but like the wall oven, it isn’t a super exciting purchase for us.
KitchenAid KFCS22EV

Wall Oven

We chose a 30″ convection wall oven made by KitchenAid.  We aren’t big bakers but given that this oven is smaller than the one in the Capital (30″ instead of 36″), we’ll end up using it more often when we need to bake because it’s smaller and faster to heat.  We were between KitchenAid and Electrolux, we ended up going with KitchenAid because we got a better price.  We liked both oven’s control panels but in the end, we didn’t spend a lot of time on the oven.  KitchenAid cooking products do very well in the JD Power reviews.  It’s hard for me to get excited about an electric wall oven, at the end of the day, it’s a box that heats.  So what if it has a dehydrate feature or a temperature probe?  I don’t know that I’ll ever use those.
We chose the KEBS107SS, at the end of the day, it’s a box that heats.

Microwaves

We planned for two microwaves in our remodel.  We usually get questions about this, but we have two now and love it.  Most of the time we use microwaves it’s to heat leftovers.  Two microwaves means we can heat two plates of leftovers at once.  This means we eat together and both eat hot food.  Frankly, I don’t know why more people don’t have two.  While we wanted two, I absolutely didn’t want a built in microwave.  As far as I can tell, all microwaves have basically the same components inside, the difference between a $700 and a $200 microwave is $500 in markup.  Built-ins are expensive,  and need to be repaired when they break.  I’d rather throw away a broken counter top microwave than fix a built in.  The repair trip will cost as much as the new counter top microwave will.
For microwave, we went Panasonic.  Panasonic has gotten rid of the annoying rotating plate.  Rather than have the food rotate, they rotate the microwave antenna.  This means this microwave is easier to clean, and I don’t have to fight with a plate that comes off of the rotator.
Panasonic is very proud of their design change.

Water 101: Know how to shut off the water main.

In a previous post, I mentioned that my water line broke and we had trouble getting it turned off.

Knowing how to turn your water off is a basic home ownership skill that everyone should have.  Here are the basics.

Ideally, every home has two water main turnoffs, one inside the house and one on the outside of the house.  The valve on the inside of the house may or may not exist, it really depends on how old the house is.  Here’s an example of what it might look like:

I chose this picture because it shows two types of valves, a quarter turn valve (the one the arrow is pointing at) and a regular valve (on the spigot).  You could see either of these types in your home.
Even if you don’t have an indoor water shutoff valve, you definitely have one on the outside of the house.  Walk around the edge of your property and look for a cast iron box like this one:
CWM stands for “City Water Meter”

This metal plate is the hatch on your water valve.  If you lift the cover off you’ll find a shutoff valve as well as a dial.  This is the dial the city reads every month or two to determine usage.  If you can’t find your meter call: 206-684-5800 and they’ll help you locate it.

Underneath the metal cover, you’ll see the water meter and an access valve, if you have a modern valve, it’ll look like this:

This is the “modern” style valve.  Turning it is easy, use a crescent wrench or vice grip and rotate so that the two holes line up, that puts it in the “off” position.  This meter is currently in the “on” position.
But what if you have the old style?  If you don’t have this kind of valve, then your valve requires a special tool, a water valve key.  Unfortunately, keys come in a bunch of different styles, I *think* the old style Seattle one is the pentagon style key.  Be warned though, the old valves are easy to break, when the city came to turn off the water on mine, they broke it twice trying to turn it off.  A better option is to call city utilities at 206-684-5800 and see if you can talk them into switching you to the new style.  Otherwise, when you do need it off, you’ll have to call the city emergency number: 206-386-1800.  They use the term “emergency” real loosely, in my case, it took them a few hours to get to my house and this was in the middle of the day.

How and Why I moved my gas meter.

In preparation for our remodel, I had to upgrade and move my gas meter.  This is the story of how and why we did it.

Why did you move your gas meter?

My current gas meter is in the way of what will be my new front door.  Obviously, it’d be an imposition on guests to make them step over the meter when coming in the house but it’s also not to code.  Code requires 3 feet of clearance from any passive air intake and 10 feet from any mechanical air intake.  There are a lot of other placement rules too, PSE puts them all in a handy guide.

Why did you upgrade your gas meter?

My house originally had the model A250 gas meter.  The A250 is rated up to 300,000 BTU/hr.  A BTU or British Thermal Unit equates to the amount of energy required to heat one pound of water from 39 to 40 degrees Celsius.  In order to calculate the BTU used, you add all of the load of all of the appliances in your home that use gas.  If it’s a load that’s always on like a furnace or water heater, you use the full amount, if it’s a transient load like an oven or fireplace, then you take 75% of the load.
Here’s the breakdown for my house:

Even with the 25% deduction, I’m still over the 300k BTU limit.  My new meter is the A450 which is good for up to 540k BTU.  This is sounds like a lot more, but a tankless water heater is a 200k BTU load which means my total gas usage will eventually be 491,250 BTU/hr.  This means I have 40k left if I ever want to add a space heater to my deck.

How do you move your meter?

First thing you do is call Puget Sound Energy at 1-888-321-7779.  They will tell verify your load calculations and also check to see if the line coming to your home can handle the new load.  I got lucky, my house has a steel pipe going to it that’s worth up to 1,000,000 BTU/hr.  New homes get a plastic pipe that caps out at 400k BTU.
PSE will assign you a project number and then you’ll be contacted by Infrasource, PSE’s exclusive contractor for doing the line move.  Infrasource will come to your home, do a site survey and work with you to find a new location for the meter.  They’ll call you with an estimate.  PSE subsidizes the cost of the move if you’re upgrading service.  Once you agree on the price, they’ll mail you a contract.  You send it back signed and they’ll schedule the move.
PSE will only handle the work on the outside of the house.  Work done on the inside needs to be done by a licensed contractor.  This work can be done by plumbers, or HVAC companies.  As usual, get multiple bids.  In my case, I got two: one for $2,345 and one for $900.  I went with the $900 and was happy I did.  The contractor you choose will need to pull a permit and you’ll have to ge tthe work inspected before PSE will let you connect the new meter.  
The easiest way to do this is to have the interior contractor do all of the work on the inside of the house without taking your gas offline.  They can get the work inspected, and then have them come back when PSE does the outside work.  If you show the Infrasource crew your signed permit, they’ll connect the new meter to the pipe.  Once all of the work is done, PSE will send a technician to relight your appliances.

How does Infrasource actually move the meter?

Infrasource digs two holes in your hard, one where the existing line is and one where the meter is going to be.  They then use a tool called a “mole” to bore a tunnel between those two points.  They then run a new plastic pipe between the two locations.  When they’re done, all you’re left with is a white cap in your yard where they moved the gas line.

How did it go for you?

My job ran into a few snags.  First off, they accidentally cut my water line.  The ground in my yard was really hard so they used a pneumatic spade to break up the dirt.  In the process, they did a number on my water line.  The yellow pipe in the picture is the original gas line, the mangled copper line below it is what’s left of my water line, that copper line should be straight and round.
As soon as they broke the line, they tried to turn off my water.  Unfortunately, my house had an old style water shutoff so we had to call the water emergency line for the city and have them come out and turn the water off.  The woman from the city water department was awesome, not only did she turn my water off, she replaced the valve with the modern one and helped the gas company fix my leak.  You can see the patched line and the new gas line in this picture:
When it was all said and done, I had my new meter installed and you couldn’t even tell any work had been done.

How I Went Appliance Shopping

We’re building our dream kitchen but that doesn’t mean we wanted to pay nightmare prices for our new appliances.  I had spent months doing the research on which appliances I wanted, why wouldn’t I do a little work to get the best price?

There are many appliance stores in the Seattle area and I quickly narrowed down to three that would work for me, but let’s go through all of the options (that I know of):

Appliance Stores

Nationwide Sellers:

These are the big brands we’re all used to seeing, they’re the big box stores.  They don’t carry the high end brands but you can still get nice brands here.  Home Depot just started carrying Electrolux and the Kenmore brand is pretty good.

Sears: Believe me, I’m as shocked as you are that they’re still in business.  At one point Sears was the largest appliance retailer in the US, they’re also have their own in house brand Kenmore.  Kenmore is the most popular appliance brand in the US.  It’s also not a real brand, Kenmore appliances are rebranded appliances from other companies, often at a lower price.  The trick to Kenmore is finding out who makes the actual appliance.  In my case, I wasn’t interested in the Kenmore brand.  For other appliances, think of Sears as your baseline.  Sears is the most you’ll ever pay for an appliance.  The local stores understand that Sears is the most popular seller and they’re not stupid, they’ll stay competitive.  Of the national stores, I definitely think Sears has the most knowledgeable sales people but it’s been hit or miss for me.

Best Buy: I didn’t even look at Best Buy, they’re prices are normal, there selection is slim compared to the other stores and I’ve never had a good customer service experience at Best Buy.

Home Depot/Lowes: These guys sell a lot of appliances and are usually running some sort of special like free shipping or some other discount.  I didn’t spend too much time here because the selection is slim and they don’t carry any of the appliances I want.

Local Sellers:

The local sellers run a wider range of brand than the big box stores, don’t be intimidated by the show rooms, while they tend to focus on the higher end brands, they can all order the lower priced brands as well.  Usually at a better price than the big box stores.

Albert Lee: Albert Lee is the largest of the local sellers with five stores.  You’ll get your best price with them during the November warehouse sale, usually the first weekend in November.  Albert Lee carries BlueStar, not Capital.


Almvigs: Located above the Whole Foods at 65th and Roosevelt, the store is small but packed full of good brands.  The staff knows what they’re doing and the owner is usually there too.  Almvigs has lots on display and they’re willing to order from companies they don’t normally do business with.  Almvigs carries Capital.

Basco: Basco isn’t really local, they’re a Portland based seller with a Seattle warehouse.  Their Portland sales floor is gorgeous.  They can sell to Seattle but they don’t do delivery.

Metropolitan Appliances: Metropolitan Appliances is in SODO, they used to be called “Direct Buying Services”, they changed their name to disassociate with the “Direct Buy” scam.  Metropolitan has a lot of good stuff on display, and they’re able to get a lot more.  MA carries Capital.

Seattle Home Appliances: I didn’t spend much time in here, they don’t carry as many of the high end brands and didn’t carry Blue Star or Capital and when I asked, they were pretty indifferent about it.  They described Blue Star as ok, and didn’t understand why people like Capital.  They seemed pretty defensive aobut the gap.

Online:

I looked at a few online websites, but decided I didn’t want to go there.  The pricing is better, but if something goes wrong, you’re pretty much on your own.

How I bought my appliances

I limited myself to Albert Lee, Almvigs, and Metropolitan.  They carried the brands I was interested in (BlueStar and Capital).  I had been to each store a few times and had been working with a saleman at each place.  I gave each salesman my list of appliances and asked them to e-mail me their best prices.
Albert Lee gave me good pricing, but said their best prices come during their warehouse sale and I should wait for that if I can.  The problem with this is that they don’t know what’s going to be on sale during the warehouse sale and I thought i twas unlikely that the specific range I wanted would be on sale (not many people order ranges with a grill).  I wasn’t willing to wait until the beginning of November when my delivery needed to be at the end of November.  Finally, Albert Lee was unwilling to order the Modern Aire hood that I wanted.  I didn’t want to have to buy the hood separately, I wanted a single point of contact for dealing with problems.
Almvigs was definitely the most pleasant experience, when I asked them about the right time to buy the salesman said “I have to give my best price every day”, and then followed up with it.  Almvigs pricing was the best of the three, by quite a bit.  They were even willing to store my appliances until I was ready for them (three months later).
Metropolitan Appliances is where I spent most of my time looking at the options because they had so much Capital equipment on display.  They were also willing to order the hood but their pricing was the worst of the three.  They were off by several thousand dollars from the other two.  I was really surprised at how bad the pricing was, but since I had been working with the rep for a few month, I decided to give him another chance.  I let him know that he wasn’t competitive in his pricing and the response was less than optimal.  Metropolitan wanted me to give them the other companies bid so that they would beat it by 10%.  They wanted to make sure it was a real apples to apples comparison.  When I asked for clarification, he said he wanted to make sure that I wasn’t getting a floor model or open box.  I thought that was insulting, as if I didn’t know what I was buying, but it doesn’t matter, business is business.  I responded that I wanted him to give me his best price and that I didn’t want to give him the other bid.  Why should I do their work for them?  Best case, I get a bid that’s better than 10% off, worst case, I get the already very good bid from Almvigs.  MA responded with a competitive bid but it was still $500 more than Almvigs.

How much did I save?

I think I did pretty well, the chart below compares what I paid to the list price as well as what I could have paid if I had bought online.  The online prices are the lowest price for each item on Google Shopping from a 5 star seller.  The chart below is the percentage difference of what I paid from list, online, and online after I factor tax into the local sale.  When the percentage is negative, I paid less, when it’s positive, I paid more.  In the end, I saved nearly 14% off of list price overall and paid 5% less than online.  Of course, the third column assumes you don’t pay the “use tax” after buying online.  If you’re not worried about the use tax, then I would have saved 4% buying online.  Items are listed in terms of most expensive to least expensive, and while I realize anyone could reverse engineer my actual prices off of this chart, I’d rather not publish that.  The 4.18% difference is well less than $1,000, I think that’s a worthwhile fee to pay for shopping locally and having a local company responsible for everything going right.

This sucks! Kitchen Ventilation

My new range is a 36″ beast with four high power burners and an indoor grill.  To get the most out of this range without setting off the smoke alarms required careful planning around how I’m going to vent.  Making this harder is that I’m putting the range on an island.  This means I lose the advantage of having a back wall to keep the smoke from drifting too far.

On top of this, I really don’t like range hoods, I’m not sure anybody does.  They’re very noisy, they tend not to work (how many times have you triggered your smoke alarm when cooking?), and they block the view and interrupt the openness of my new kitchen/dining area.

This leads to a collection of design goals that feel like they’re at odds with each other:

  1. Quiet
  2. Powerful
  3. Effective
  4. Aesthetic
Quiet
To get quietness, I moved the blower to the outside of the house.  Now, I won’t have to deal with the sound of the motor inside the house.  Unfortunately, the motor only accounts for some of the noise.  The air movement is also a noise generator.  I have a couple of options there.  I can move less air, which contradicts goals three and four, or I can quiet the air movement.  
The Abakka external blower
Plan  B sounds better, to quiet the sound of the air movement, I’m doing to things: Using a big duct and adding a silencer.  My new hood will have a 10″ round duct, a standard home range usually has a 6″ duct.  I’m going from 25 square inches of space to 78 square inches, a 2.7x increase in space.  I’m also adding a Fantech silencer.  The silencer is a muffler that also further reduces the sound the air makes as it travels.
Ignore everything but the “LD Silencer”

Powerful:
This one is easy, because I moved the blower to the outside of the house, I can install the most powerful one I can find.  In this case, that’s a 1400 CFM (cubic feet per minute) blower.  This blower has the power to clear all of the air from my house every 18.3 minutes.  To put this in perspective, the standard microwave hood is closer to 200 CFM.  The downside to a 1400 CFM motor is that building code requires me to add Make-Up Air (MUA) to my kitchen.  MUA is a mechanism for replacing the air that is removed from the kitchen by the vent.  I’ll write about this in detail once I’ve finalized on a solution.

Effective:
All of that air sucking wouldn’t do me any good if it didn’t actually capture the effluent coming off of the stove.  To make that easier, I’m over-sizing my capture area.  Think of the capture area as the overhang of the hood.  If smoke gets into the capture area, then the blower can suck it out of the house.  My range is 36″ wide by 24″ deep.  My range hood is 42″ wide by 30″ deep, an extra 3″ on each side.  This, combined with the powerful blower should provide an effective air removal system.

To further enhance the effectiveness, I want a hood that uses baffles instead of a mesh filter.  The filter is responsible for keeping the grease from clogging up the ventilation duct.  The two types of common filters are baffles and a mesh.  Mesh filters are usually made out of steel or aluminum and work by forcing the effluent to go through small holes in the mesh, the grease gets trapped in the metal.  Baffles work by forcing the air to turn and bend around the metal, when the air bends it accelerates and the grease spins off.  Both types of filters are cleaned in the dishwasher, but over time the mesh filters lose their effectiveness because they can’t be cleaned as thoroughly (certainly not as easily).

Aesthetic:
In a perfect world, I wouldn’t have a hood at all.  I think they’re generally ugly and putting one on my island means I am interrupting the openness of my living space.  I can’t get away from the fact that I’m going to have a large hood, it will have a 10″ wide duct and will be 42″ wide at it’s widest point.  Instead, I went with a hood that tries to be as simple and smooth lined as possible.
In the end, I chose the Modernaire PSI-16
The PSI-16 is custom built when ordered in California by Modernaire.  It meets all of my requirements and has a small horizontal profile so hopefully it won’t be too overbearing.  It also has some other features I really like.  The lights and the blower are on infinite knobs so you can very their settings precisely.  With a 1400 CFM blower, I want a lot of control so I only suck as much as I have to.

My new range: Capital Culinarian 36″ with Grill

We ordered the new appliances for our kitchen last weekend.  I’ll make a general post on how I bought the appliances, and I’ll also put up another post describing my other appliances but I thought the range deserved its own post.


In a previous post, I talked about why I chose a gas range over an induction range.  Gas ranges come with two different type of burners: open burners and sealed burners.
Image of a sealed burner.
Sealed burners are designed to prevent spills from entering the internals of the oven.  Fans claim they’re easier to clean but they have three attributes I don’t like.
  1. Flame Pattern
  2. Power
  3. Cleaning
Flame Pattern: Because the burners are sealed, the flame doesn’t shoot straight up but instead comes out of the sides of the burner.  This creates a heat “donut” on the pan, rather than the more even heat of an open burner.
The fine folks at Eurostoves made a video demonstrating the difference in heat pattern between the open burner Capital Culinarian and sealed burner ranges:


Power: For reasons I don’t understand, open burner ranges are available with more power than a closed burner.  We do a lot of searing in our house and I wanted a burner that would get really hot.  I also hate waiting for water to boil.  Further, I’ve never heard anyone complain that their range was too powerful.
Cleaning: In my previous house, I had a sealed burner range, whenever anything spilled over, it meant scrubbing and scrubbing to get the junk off and I always struggled getting the very edge where the burner sits on the range clean.  With an open burner, spillover will fall into a catch tray which can be covered with aluminum foil.  Cleaning that seems easier but I’ll put up an update when I actually have the range and have to clean it.
Given my desire for an open burner, I had three companies to choose from: Blue Star, Capital, and American Range.
I quickly dismissed the American Range, when I saw it in person I found it clunky and I wasn’t happy with the build quality.  I also didn’t like how poor the information on their website was, there were typos and inconsistencies between what the website said and what the vendors said.  The American Range Performer (American Range’s open burner range) is also relatively new and hasn’t been on the market too long so it was hard to find actual reviews of it.
The competition came down to Blue Star versus Capital and I hate to say it, but I don’t have a good reason for choosing one over the other.  They’re extremely competitive ranges with marginal differences between them.  The Blue Star has two high power 22,000 BTU burners, a simmer burner and a 15,000 BTU standard burner.  The Capital has four 23,000 BTU burners and claims that they can all simmer.  Reviews online make me believe the Blue Star wins when it comes to simmering but that’s not a very common use case and I’m convinced I can get a good simmer on the Capital as well.  Both ranges offered a grill and both have infrared broilers.
The infrared broiler is a feature I’m really excited to try.  The infrared broiler produces 1800° F heat.  A traditional broiler is closer to 550°-600° F.  I want an 1800° F broiler to be able to cook steaks the way Ruth’s Chris does.  Ruth’s Chris has custom designed broilers that cook both sides at 1800° at the same time.  Mine at home won’t be quite the same, but I’m hoping to get close.
This decision took months, In the end, I chose the Capital Culinarian for a couple of reasons: I liked the fit and finish more and I also liked the flexibility of having all four burners be the same.
Here’s a stock photo of my new range.  I’m looking forward to having a grill inside the house!  Grilling indoors adds a lot of complication, you need to plan your ventilation solution around the extra smoke that grilling will produce.  I won’t be able to do super messy grilling like you would with an outdoor grill because the cleanup will be more work, no sugary marinades or very greasy meats.  What I will be able to do is easily mix grilled foods with other foods when cooking.  I think the first meal will be steaks cooked with the infrared broiler, grilled asparagus, and sauteed mushrooms.
If you’re curious about how I’m venting this range, see my ventilation post.

I love my heat pump.

When my wife and I first moved into this house, we wanted to add an air conditioner.  Seattle is full of people who tell you that “you don’t need an air conditioner”.  They’re in deep denial.  The beauty of air conditioning in Seattle is that the cost of running an air conditioner is proportional to how hard it has to work.  Since Seattle has generally very mild weather, it doesn’t cost much to run the air conditioner but on the other hand, it means my house is a happy 68 degrees* all year round.

Instead of adding an air conditioner, what we really did was install a heat pump.   Simply put, a heat pump uses a little bit of energy to move heat from one location to another.  In the summer, we use it to move heat from the inside of the house to the outside, in the winter, we move heat from the outside to the inside.  If you want to know more about how they work, How Stuff Works has a very detailed explanation.

In addition to being able to cool in the summer, the heat pump has some other great properties:  It’s inexpensive to run, it produces a nice mild heat in the winter as opposed to “bursting” high heat the way a furnace does, and, it’s “greener” than a conventional gas furnace.

Because they heat in the winter by pulling heat from the outside, they stop being efficient once the temperature outside gets too cold, you still need to pair it with a supplemental heat source.  In my house we use the existing gas furnace, if you didn’t already have a gas furnace, you can add electric heat elements to the heat pump.  The downside to the electric heat elements, is that you lose the efficiency when they turn on.

In my house the gas heat is set to turn on around 35 degrees.  The good news is, that doesn’t happen all that often around here:

weather.com

As you can see, the average low in this city never drops below 37.  It’s only on the occasional cold nights that my furnace turns on.  In the summer, we’re never really cooling all that much, relative to the outside temp so it runs pretty efficiently too.  On the really hot days, we love having it!

A lot of people ask how much it costs to run, this is really hard to say since it isn’t separated on my electric bill.  My entire electric bill for my house is around $80-$120 per month depending on whether or not I’m on winter rates, summer rates, and what time of the year it is (Fall and Spring are best for me).  Of course, this covers a whole lot more than jut the heat pump, computers, lights, etc… on roughly 3200 sq. ft. of home.

So, we love our heat pump, the AC is great in the summer, we love how it heats in the winter, but is it worth the cost?  It depends…  In our case, we had a perfectly working furnace and while I believe AC is important, it’s definitely not necessary.  Further, the heat pump isn’t so efficient that it’ll pay for itself over it’s lifetime when compared to keeping my gas furnace.  However, if you’re already set on buying an air conditioner, buying a heat pump instead is only about $1,000 more and you will make up that cost over it’s lifetime.  Definitely, if I were doing new construction, I would install a heat pump over any other source.

In addition to whole house heat pumps, there’s another type on the market: Ductless Heat Pumps.  Ductless heat pumps have been around for over 40 years are very popular in Europe and Asia.  These things are very efficient and work on a room by room basis.  Seattle is tripping over itself to give people money to install them (http://www.ci.seattle.wa.us/light/Conserve/dhp/).

* A note on the house temp.  I like the house cold, my wife doesn’t.  For some reason this is the only argument I’ve ever been able to win.  It also means that she wears a hoodie in August when we’re in our basement.

AOE: Water damage and backwater valves

A few years ago my rental home experienced what I like to call an “adverse ownership event”.  In my book, an AOE is the kind of thing that makes you wish you were a renter and not a homeowner.  While I love home ownersihp, there are the occasional incidents that make me wish I could just call a land lord and say “this is your problem”.

My AOE was a sewer line flood of my basement rental unit.  My renter was home and out of nowhere, the sewer line started backing up into his unit.  He called me and I had to get to work dealing with it.  Luckily, he noticed a Roto Rooter truck at the neighbors house, my neighbors had cleared their sewer line and it had jammed further down and blocked my line.  This was luck for me because it meant I could show my insurance company that someone else was responsible which means they’d pay for the damage (more on this in a later post).  The reason my neighbors could affect me like this is because we are on a shared side sewer.  The side sewer is the sewer line that connects your home to the city main line.  It is the homeowners responsibility to maintain the side sewer, in a shared side sewer situation, multiple homes use the same side sewer line.
When the sewer line backed up I ran to the house and got the Roto Rooter guys to clear the blockage all the way down to the sewer main so that the sewer line to my house would start to drain again.  Next up I had to call a water damage company, you’ve seen the commercials on TV, these are the companies that claim to make things like it never happened.  When dealing with sewage, anything the waste water touches has to be removed, all of the dry wall, wood paneling, carpet, etc…
The water damage people removed the carpet, the bottom 6 inches of the wood paneling, and the drywall.  Unfortunately they couldn’t remove the floor tiles because they contained asbestos.  I had a specialist company come out to remove that (thankfully insurance paid!).
The basement unit was extremely old, at least 30-40 years so I used this as an opportunity to redo the basement unit and modernize the kitchen and bathroom.  My main concern at this point was, how do I keep this from happening again?

The answer to this question is pretty straight forward, I have basically two options, I can redo the sewer to my house so that I’m not sharing it with anyone else which would be way too expensive for me to justify, or, I could install a backwater valve.
A backwater valve is a one way valve that lets sewage go out, but prevents it from coming back into the house.  It’s an extremely simple device and not expensive, mine is a $200 valve I bought at backwater-valves.com.  The valve has a plastic gate in it which floats, if water flows back in then it will automatically raise the gate and keep water from going back into the house.  Once this happens, the only danger we have is that someone in the house will run water and fill the pipe.  To prevent this from happening, we attached an alarm to the backwater valve so that we know when the valve has stopped.
When the alarm goes off, the tenants call me and I call someone to clear out the sewer line.  Easy and I sleep much better at night knowing this won’t happen again.
Installing a backwater valve can be tricky, you need to  install it between the point where your house sewage drains and where the  shared line starts.  This usually means digging down fairly deep to install it, in my case, it meant my contractor renting a jackhammer and installing it in my basement.

Fire Alarms and Carbon Monoxide Alarms

Let’s talk smoke alarms.  Smoke alarms are missing in 30% of home fires.  About two-thirds of the deaths in home fires are in homes that either didn’t have a smoke detector (40%) or didn’t have a working smoke detector (23%) (source).

Things everyone should know about smoke alarms:

There are two types of detectors

There are two types of smoke detectors, ionization detectors and photoelectric.  Both types are effective and need to pass the same standards to be UL listed.  Ionization detectors react faster to quick burning, small particle fires while photoelectric respond faster to smoldering fires.  In general, I think it’s a good idea to have a mix of types, new alarms even come with both detector technologies integrated in one unit (example).

Ionization Alarms

The ionization alarms work by using a small amount of radioactive material to ionize the air between a pair of plates.  The ionized particles migrate to the two plates creating a small electrical current.  When smoke enters the ionization chamber, it reduces the amount of ionized particles that can reach the two plates.  This creates a current drop which sets off the alarm.

Photoelectric Alarms

Photoelectric alarms work by shining a light through a tube that looks like a “T”.  The light goes through the “top” of the “T”, when smoke enters the chamber, it causes some of the light to reflect down towards the “base” of the “T”.  A light sensitive sensor on the base of the “T” is triggered when enough light bounces down.

Smoke alarms expire

That’s right, smoke alarms have an expected life of 10 years.  If you pop  the alarm off of the wall it should have a manufacture date.  Smoke alarms are cheap, if you’re past the 10 year date, it’s time to buy new ones.

Where should I put them?

FEMA, and the Washington State Fire Marshall recommend placing smoke alarms “near each sleeping area and on each level of your home.”  In my home, I have one in each bedroom and in every hallway.  The bedroom units are ionizing, the hallway units are dual sensor.

Hard wired or battery operated?

In general, if you have the option for hard wired alarms, that’s a better choice.  Hard wired alarms receive line power as well as have the battery backup.  They also have the advantage of being linked together which means if one goes off, they’ll all go off.  This enhances the odds of safely getting out of the house.  For hard wired alarms, I recommend this one: Kiddie dual sensor wired alarm,  I like it because it’s inexpensive and has both types of detectors.
If, like me, you don’t have the option of wired alarms, there are plenty of sound battery operated ones.  I recommend this one: Kiddie dual sensor battery alarm.  This is the model I have in my hallways, it’s inexpensive and has both types of detectors.

Lithium-Ion batteries

A neat trick you can do is to use a lithium-ion 9-volt battery instead of a normal one in your smoke alarm.  These have a 10 year lifetime.  This doesn’t get you out of regularly testing your battery but it does mean you won’t be woken up in the middle of the night because the battery is dying.  They’re more expensive than the alkaline, but cheaper in the long run.

The test button doesn’t actually test the detector

The test button on the alarm doesn’t actually test the detector, it only tests that the battery is good.  In order to test the actual functionality of the alarm safely, you need a product like “Smoke Test“.  DO NOT USE A FIRE TO TEST YOUR ALARM.  Don’t be an idiot, think of how stupid you’ll feel if you burn your house down trying to test your alarm.

What if I can’t afford a

 smoke alarm?

In the city of Seattle and many other cities, the Fire Department will provide you with a smoke detector if you are unable to afford one.  Please contact your local fire department for more information.

What about Carbon Monoxide (CO)?

Carbon Monoxide is an odorless, colorless, tasteless gas that is toxic.  Because it’s impossible to detect by us mortals, it’s often called the “silent killer”.  According to the CDC, “For the period 1999–2004, an average of 439 persons died annually from unintentional, non–fire-related CO poisoning (range: 400 in 1999 to 473 in 2003)”.  
Carbon monoxide is a by product of combustion and CO poisoning is often a result of a poorly running or poorly ventilated furnace or other fire inside the house.  Because we can’t detect it naturally, a CO alarm is a must for any home that has gas or oil powered appliances.  I think every home should have one on each floor, regardless of heat source.
CO alarms are also relatively inexpensive, in the $20 range.