The four most expensive words in remodeling are “While you’re in there”. It’s extremely tempting to add additional scope to a project. In theory, doing more now is cheaper than doing more later, the contractors are already there right? The downside to this is that it can go on forever and is really unhealthy for the budget.
In our case, we were penny wise and pound foolish, in our eagerness to control scope on our project we didn’t let Stefan (our architect) do any design work for the basement. In our minds, we thought we were only doing a main floor remodel and the basement would be phase 3 (after the second floor). The reality is, our basement was completely torn to shreds as a result of moving the stairwell. In one of our walk throughs with our architect we realized we had an opportunity to “fix” our laundry situation. The real issue we had is that our laundry was the first thing we saw when going into the basement, we effectively walked through our laundry area every time we went to the family room.
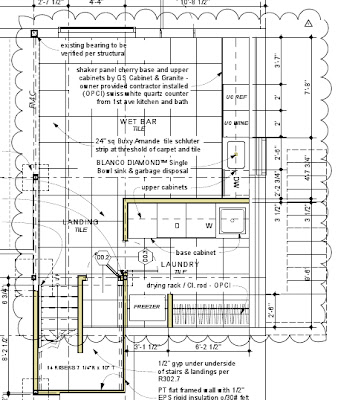
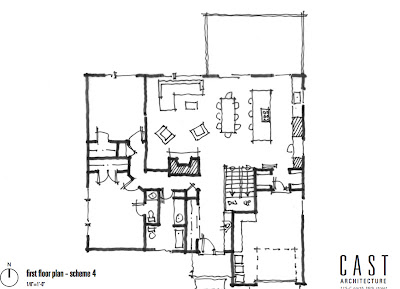
We realized that we could move things around and get the laundry out of the main area which opened up the possibility of a wet bar. We gave Stefan a few days to come up with some drawings and this is what he came up with:
For those of you who aren’t stalking me, here’s what the original plan was. The washer and dryer would have gone right next to the window.
The new plan gives us a dedicated laundry room which hides the washer/dryer and gives us a utility sink. It’d be unamerican of me to let an available sink hookup go to waste so we decided to add a wet bar.
A Wet Bar?
A wet bar is a bar with a sink, in our case, it’s more than that. We’re not big drinkers, but thanks to our wedding we have enough booze to open a bar. We also like soda and the idea of having it cold and available in the basement is too good to pass up. Our wet bar will feature plenty of storage for the liquor and associated glasses, a wine fridge, an under counter bar fridge, and a dishwasher. As per our style, we wanted to contain costs as best as we could but, we still wanted to get nice things where it makes sense.
Cabinets and Countertops
We knew we didn’t want to pay for the cabinet and countertop quality we’re getting for the kitchen. In addition to being pretty expensive, the kitchen cabinets have too long of a lead time for us. I also didn’t want to go Ikea because I didn’t like the styles and I really wanted all wood boxes. This lead us to the Chinese cabinet companies in Sodo.
Why do I call them Chinese cabinet companies? The signs on the stores are all written in English and Chinese. We visited three of them:
Pius Kitchen and Bath,
First Ave Kitchen and Bath, and
G.S. Cabinet and Granite. We ruled out Pius pretty quickly, their cabinet quality wasn’t very good. I had used First Ave in the past for a rental unit and knew the cabinets were great quality. Unfortunately, while I was in there I overheard the woman at the counter snap at a customer “You didn’t understand me…” maybe the customer made a mistake, maybe 1st ave did but it left a bad taste in my mouth. Finally we looked at GS. GS had the largest quartz and granite collection, they also supply the cabinets to 1st Ave KB. Unfortunately, they were a little more expensive than 1st Ave but I was able to talk them down to match the price.
GS also struck me as the most professional, they quickly drew up my cabinets in a cad program so we could approve it. We went with them and scheduled for an install date a few weeks away. The trick to these cabinets is that they’re all in stock, which means quick turn around. It also means reduced flexibility, you only get what they have, they can’t customize for you so you run the risk of having a sub optimal layout in your space. For us, it didn’t matter, we’re doing one wall of cabinetry. On the plus side, you get all wood boxes and doors and Blum cabinet hardware. Blum makes some of the best hardware for cabinets (they also make the Ikea hardware). All of our cabinets are going to have soft close drawers and doors, no extra cost. Speaking of cost, we’re paying $2,200 installed for our cabinets.
GS also does countertops, if you go to Home Depot or a larger kitchen shop, you will end up paying for cabinets by the square foot. Home Depot has a wonderfully complicated formula, you get a per-square foot cost plus a linear foot cost for the edges. GS doesn’t do it that way, at GS you buy slabs and pay for installation separate. I ended up paying $1,150 for the counter tops which includes two slabs of “Swiss White” quartz, which looks a lot like
Cambria’s “Whitehall”. By my math, I have 28 square feet of countertop which works out to $41 installed. The equivalent at Home Depot was $2,172 or $78 a square foot. I saved almost 50%.
Appliances
This aspect of the wet bar was just shocking. Thankfully we already have a “built-in ready” wine fridge so I didn’t have to buy one. I did however, have to buy an under counter fridge. If you don’t want to build it in, then you can find one relatively cheaply from
Frigidaire. Lowes has their own version of it that’s $100 less, you should be able to get one for under $450. Unfortunately, ours needs to be built in. In addition to adding expense, built-in fridges vent forward instead of out of the back or sides. Built in under counter beverage centers that get cold enough, as in, below 37F cost more than $1,500 and can go higher than $3,000.
We were between a Marvel and a U-Line. We ended up going with the U-Line because we liked the shelving layout more.
We’re also adding a dishwasher, this isn’t a requirement for most people but it should be. Our wet bar is on a different floor from our kitchen. In none of my fantasy simulations did I ever think we’d actually wash the glasses by hand. This means that we’d have to take them upstairs and then bring them down again. In reality, we would likely pile up dirty glasses in the basement until one of us got frustrated enough to bring them upstairs and wash them, then we’d have a pile of clean glasses upstairs that needed to be moved back down. Forget it, we’re getting a dishwasher. We had only two requirements for this dishwasher: quiet, and racking that would let us store a lot of glasses. Quiet lead us to four different brands: Miele, Bosch, Asko and KitchenAid. All four brands make great dishwashers but the racks on the Bosch ruled them out for our use case, it’d be awkward to put glasses on the bottom shelf. Price ruled out Miele and Asko. We ended up with a
KitchenAid KUDE60FXSS. The KitchenAid has three racks like the Miele do, is only 43 dB (we won’t hear it when it’s running), and cost less than the alternative. My 8 readers will also recall that I’m a fan of KitchenAid dishwashers, normally because of the grinder which this one doesn’t have.
We bought the appliances the same way we bought the last ones (
check out my post on how to buy appliances). This time, Albert Lee won, we saved a lot and actually did better percentage wise than we did on the kitchen appliances:
I feel sorry for anyone who walks into an appliance store and pays sticker or “sale” price.
Laundry Room
Nothing really fancy going on in here, as per the rest of the remodel, we’re going with LED lighting and we’re reusing our washer/dryer and freezer. The only notable purchase I made was the utility sink. I originally wanted a traditional utility sink, a plastic tub on four legs. As I started looking for one, I didn’t like the reviews that talked about cheaply made and flimsy sinks. This thing is going to hold 20 gallons of water, I want it to be sturdy. I found a company that sells granite composite laundry sinks, we’re putting granite composite sinks in the wet bar and the kitchen because of their general indestructibility. We’re going with the
Mustee 17F.